Step by step instructions
Getting CallClerk nofitications on your android device
Please note: This is not an official addon, and it’s not supported by Rob Latour, it is completely made by www.bit-bite.de.
This page provides you with all the information which is needed to get notification about incoming calls to your android device. This step-by-step instruction assumes that you
have the program „CallClerk“ (www.callclerk.com) installed and configured properly to send
out caller ID notificatons. (In the Tab „Display“ from the program CallClerk).
Follow these steps to get call notifications to your android phone:
1. First, download and install the Android „Android Call Notfier for CallClerk“ App.
Refer to the download section to get the links.
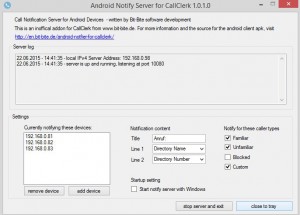
2. Download the „Android Notify Server“ to your Windows PC running CallClerk.
Please refer to the download section on this page to get the links. This program forwards notifications from CallClerk to your android devices.
Please read the point number 3 in the FAQ if you are interested in why you need the additional program „Android Notification Server“.
 After you have installed the Server, you can see the user interface of the server. On the left site of the setting, you have to enter the IP of your android device which is supposed to get the notifications. This android device must have the „Android Notify Server“ app installed (see step 1). On the right side of the settings panel, you can choose a text which is used for the notification title, followed by two lines, which are provided by CallClerk and gives you the information about who’s calling.
3. Make sure your Android device has a static IP
Please ensure that your android device has a static IP. If you have set the IP to a dynamic one, the ip could change during time, and you have to update the ip in the Server program (see step 2).
Follow these steps to give your android device a static ip:
Go to the WLAN settings of your android device, where all the known WLAN points are listed.
Hold your finger on the WLAN with which you are connected, until a menu appears. Select „change settings“ (name may differ in some android versions). On this setting panel, scroll down and activate „Extended options“. You should now see an option „IP-Setting“. Please choose „static“, not „DHCP“. Then, in the field „IP-Address“, enter a valid IP Address. (eg 192.168.0.70 or 192.168.1.70, depending on you home network configuration).
In cases of problems and/or questions you can check the FAQ or contact me directly at m.gruosso@bit-bite.de
